Today, I am going to go over setting up a droplet. There are some pieces that require more work that I do not include in this article. But I will hopefully make it clear, so you can start setting up your server soon!
Setup Droplet
This is going to be the easiest step! Simply sign up for an account at Digital Ocean and create a new droplet. As I said before, you can get $10 to try it out today if you are new to Digital Ocean by clicking here.
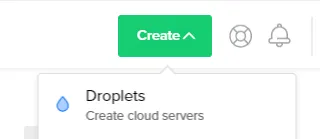
Click on the Create Button at the top right side of your screen. (It may change location if Digital Ocean decides to change their layout) And select Droplets, to create a new cloud server.
Choose Ubuntu 16.04 x64. Although Ubuntu 18.04 LTS is out, it is not as mature as 16.04 is. You can try installing that one and configuring it yourself, but then, you must figure it out yourself.
Go ahead and choose your droplet size. For a small website, the $5/mo droplet will work just fine! At the current time of writing this article, it includes 1GB of RAM, 1 vCPU, 25GB of SSD Storage and 1 TB of Transfer Bandwidth. This is more than enough for a small website. You could even host 10 small websites using this small droplet.
If you will be using this as a production server and want to make sure you have weekly backups, enable backups at this time. It is an additional cost of 20%. So for $5/mo droplet, it will be an additional cost of $1/mo. Not too bad for a backup service, although you could do a cheaper way by making snapshots yourself of the server, and using a wordpress plugin to save some of the files, but it is much easier to just enable backups.
Now, choose your data center, I recommend choosing one that is closer to you. Since I am on the East Coast of the USA, I choose New York. As for which number to choose, choose which ever you like. I usually stick to one of the numbers going forward so that all my droplets are in the same data center.
For additional options I like to setup monitoring. You can choose which ever options you would like.
Here is the tricky part. Setting up your SSH Key. If you already have one, add your key now. If you do not already have one, then you may need to follow some articles here on how to create a key. Someday, I might create an article on setting it up. However, I highly recommend creating one and using it for your Droplet, or else, security isn’t the best.
Now choose a hostname. A hostname has already been pre-configured for you, and you may use it as is or change it to something easy to remember.
The next step is now to specify your project. You may leave it in your default project or put it into a project you want. Up to you. Now click the big CREATE button!
You are now the proud owner of a droplet! It may take awhile to get the Virtual Private Server up and running.
Just setting up a droplet took a lot longer than I expected in words. So, in the next part, I will be going over connecting to your droplet and making some basic configurations to your droplet.
Setting Up Sudo User - Part 3 >
~Joshua
Tags: 5-mo , 5-mo-droplet , 16-04 , Choose , Create , Digital-ocean , Droplet , Going , Here , Mo-droplet , New , Now , Server , Setting , SmallSetting Up A WordPress Server Using NGINX – Part 3