
The big question right now is how to auto deploy Astro to a VPS, specifically to DigitalOcean in my case. I have a VPS running latest version of Ubuntu and I will auto deploy my Astro site to it. I have a GitHub repository for my Astro site and I will use GitHub Webhooks to auto deploy it to the VPS. In my case, I will be using a Laravel API to power the deployment process.
At this point, you should have a GitHub repository for your Astro site and a VPS running latest version of Ubuntu. To get started, let’s setup GitHub Webhooks.
Setup GitHub Webhooks
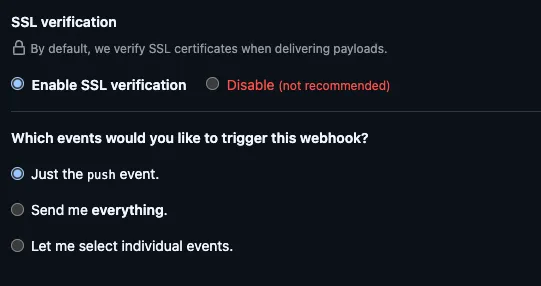
Log into your GitHub repository and go to Settings > Webhooks. Click on Add webhook. Set the payload URL to your VPS Domain and the content type to application/json. Set the trigger to push events. Set the secret to a random string. Click on Add webhook. I like to create random strings using the following command:
php -r 'echo bin2hex(random_bytes(32));'As a PHP developer, I like to use PHP to generate random strings. But you can easily use other languages to generate random strings. Just make sure the secret is at least 32 characters long.
I also make sure SSL verification is enabled.
Setup Laravel API
I will be using a Laravel API to power the deployment process. I will create a new API route in my Laravel application to handle the webhook requests. I will use the following code:
// GitHub Webhook Route
Route::post('/webhook/github', [WebhookController::class, 'handle']);
I will create a new controller called WebhookController and add the following code:
<?php

namespace App\Http\Controllers;

use Illuminate\Http\Request;
use Illuminate\Support\Facades\Log;
use Illuminate\Support\Facades\Storage;

class WebhookController extends Controller
{
    public function handle(Request $request)
    {
        // Verify the request signature if needed (for security)
        $this->verifySignature($request);

        // Get the event type from the request header
        $eventType = $request->header('X-GitHub-Event');

        // Handle the event
        switch ($eventType) {
            case 'push':
                $this->handlePushEvent($request);
                break;
            // Add more cases for different event types as needed
            default:
                break;
        }

        return response()->json(['message' => 'Event received']);
    }

    protected function handlePushEvent(Request $request)
    {
        $payload = $request->json()->all();
        // check github for payload
        Log::info('Push event received');

        if (isset($payload['ref']) && $payload['ref'] === 'refs/heads/main') {
            Log::info('Updating Website for branch ref: ' . $payload['ref']);
            Storage::disk('local')->put('updateJoshuaPack.com', 'true');
            Log::info('Website update completed.');
        }
    }

    protected function verifySignature(Request $request)
    {
        $signature = 'sha1=' . hash_hmac('sha1', $request->getContent(), config('services.github.secret'), false);

        if ($request->header('X-Hub-Signature') === null) {
            abort(403, 'Invalid request.');
        }

        if (!hash_equals($signature, $request->header('X-Hub-Signature'))) {
            Log::warning('Invalid Signature: ' . $signature);
            abort(403, 'Invalid signature.');
        }
    }
}
All this really does is create a file called updateJoshuaPack.com in the storage directory. This file will be used to trigger the deployment process. We will create a cron job to check for this file and if it exists, it will trigger the deployment process.
Setup Cron Job
We will create a cron job to check for the updateJoshuaPack.com file and if it exists, it will trigger the deployment process.
* * * * * astro sh /cronjobs/everysecondcron.shThis cron job will run every minute but within this file it will run for 60 seconds. This is what it looks like:
start_time=$(date +%s)
while [ $(($(date +%s) - start_time)) -lt 60 ]; do
    sh /cronjobs/updatejoshuapack.com.sh &
    sleep 1
done
I then have this other file called updatejoshuapack.com.sh that will run the deployment process if the updateJoshuaPack.com file exists.
# --- Configuration Section (REQUIRED: Update these paths) ---
# The full path to the file you want to check and delete.
FILE_TO_CHECK="/var/www/YourLaravelWebsite/storage/app/updateJoshuaPack.com"

# The full path to the project directory where 'make update' should run.
TARGET_DIRECTORY="/var/www/YourAstroWebsite"

# The full path of the log file
LOG_FILE="/cronjobs/update.log"
# -----------------------------------------------------------

# 1. Check if the file exists and delete it
if [ -f "$FILE_TO_CHECK" ]; then
  echo "File found: '$FILE_TO_CHECK'. Deleting..." >> "$LOG_FILE"
  rm "$FILE_TO_CHECK"
  if [ $? -eq 0 ]; then
    echo "Deletion successful." >> "$LOG_FILE"
  else
    echo "Error deleting file. Continuing with make command." >> "$LOG_FILE"
  fi
else
  # echo "File not found: '$FILE_TO_CHECK'. Skipping deletion." >> "$LOG_FILE"
  exit 1
fi

# 2. Change into the target directory
echo "Attempting to change directory to: $TARGET_DIRECTORY" >> "$LOG_FILE"
if cd "$TARGET_DIRECTORY"; then
  echo "Successfully changed directory." >> "$LOG_FILE"
else
  # If 'cd' fails (e.g., directory does not exist), exit the script.
  echo "Error: Could not change directory to '$TARGET_DIRECTORY'. Aborting." >> "$LOG_FILE" >&2
  exit 1
fi

# 3. Run the make command
echo "Running 'make update'..." >> "$LOG_FILE"
make update >> "$LOG_FILE"

# Check the exit status of the make command
MAKE_STATUS=$?

if [ $MAKE_STATUS -eq 0 ]; then
  echo "--- 'make update' completed successfully. ---" >> "$LOG_FILE"
else
  echo "--- ERROR: 'make update' failed with exit status $MAKE_STATUS. ---" >> "$LOG_FILE" >&2
  exit $MAKE_STATUS
fi
If the file exists it will delete it and run the make update command. If the file does not exist it will exit with a status of 1.
Makefile & Docker
Within the Astro website repo, I have a makefile that has a command called update that will run the following commands:
update:
	git pull origin main
	docker compose up -d --build
	chown -R www-data:www-data /var/www/YourAstroWebsite
This will pull the latest changes from the main branch and rebuild the docker containers. It will then change the ownership of the website directory to www-data:www-data. This is because I use Nginx to run the website and it needs to have the correct permissions. You maybe wondering, what does docker do. Well, you will need to make sure docker is installed on your server, this is so we can build our Astro website without having to install Node.js, npm, and other dependencies on the server. Create within the root of your Astro website a file called docker-compose.yml and add the following code:
version: "3"

services:
  astro:
    image: node:22-alpine
    environment:
      - NODE_ENV=production
      - TZ=America/New_York
    volumes:
      - .:/app
    working_dir: /app
    command: sh -c "npm install && npm run build && rm -rf ./dist && mv ./dist.new ./dist"
This will create a docker container that will run the build. This creates the new website files and puts them in the dist.new directory. Then it will move the dist.new directory to the dist directory. You will need to change your astro settings to point to the new dist directory. Add it to the astro.config.mjs file. This is so that we don’t overwrite the old files on build.
export default defineConfig({
	outDir: 'dist.new',
});
You should already have your website setup on your VPS. Either using Nginx, Apache, or any other web server. If you are not sure how to setup your website, maybe I will come out with a blog post on how to do that.
Conclusion
I hope this blog post helps you auto deploy your Astro website to a VPS. You should now be able to push to your main branch and have your website auto deploy to your VPS. If you have any questions or run into any issues, please let me know on my social media posts!
~Joshua
Tags: Astro , Vps , Digitalocean , Github , Laravel , Deployment , Cron , Github-webhooks , Webhooks , Automation , Linux , Php , Cicd , Bash , DockerUsing Antigravity AI to Build Websites
Setting Up Astro From Wordpress
Related Posts
-

My Journey from Brave to Vivaldi
My experience switching from Brave to Vivaldi and why it's a game changer for power users.
Continue to read more… -

Self-Host Obsidian Sync in 10 Minutes with Docker
Self-host your Obsidian Sync server with Docker and CouchDB in 10 minutes. Take control of your data with this private, local-first setup.
Continue to read more… -

Next Project, New Stack: Why PHP Won't Power My API
/ Blog, Programming
Why I'm moving away from Laravel for my next high-concurrency API project in favor of performance-focused languages like Go or Rust.
Continue to read more… -

Setting Up Astro From Wordpress
/ Blog, Websites, Programming
Learn how I converted over 200 WordPress posts to markdown using the wordpress-export-to-markdown tool for my Astro migration.
Continue to read more…